从 Servlet 到 DispatcherServlet
2024-09-30 08:00:49 # Technical # SpringMVC

何为 Servlet

Servlet(Servlet = Server + Applet)表示一个运行在服务端的程序。具体来说,就是实现 javax.servlet.Servlet 接口或者继承了 javax.servlet.http.HttpServlet 的类。Servlet 可以响应动态的内容给客户端。

Servlet 接口提供了 5 个方法

Servlet 接口

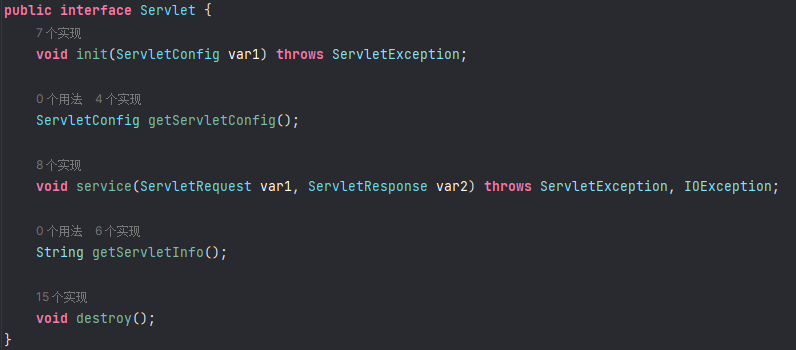
  • init:生命周期方法,在容器启动时被容器调用(当 load-on-startup 设置为负数或者不设置时会在 Servlet 第一次用到时才被调用),该方法在整个生命周期中只执行一次
  • service:生命周期方法,对客户端响应的方法,该方法会被执行多次,每次请求该 Servlet都会执行该方法
  • destroy:生命周期方法,当Servlet被销毁时执行该方法(Servlet 由 JVM 回收,所以销毁不会立即回收,再次请求时,并不会重新初始化)
  • getServletConfig:用于获取 ServletConfig
  • getServletInfo:用于回去一些 Servlet 相关的信息,如作者、版权等,这个方法需要自己实现,默认返回空字符串

ServletConfig

ServletConfig 作为 Servlet 的配置对象,提供 Servlet 上下文,以及初始化参数。我们在 web.xml 中定义 Servlet 时,通过 init-param 标签设置的参数就是通过 ServletConfig 来保存的,比如,定义 Spring MVC 的 Servlet 时指定配置文件位置的 contextConfigLocation 参数就保存在 ServletConfig 中:

1
2
3
4
5
6
7
8
9
<servlet>
<servlet-name>demoDispatcher</servlet-name>
<servlet-class>org.springframework.web.servlet.DispatcherServlet</servlet-class>
<init-param>
<param-name>contextConfigLocation</param-name>
<param-value>demo-servlet.xml</param-value>
</init-param>
<load-on-startup>1</load-on-startup>
</servlet>

ServletConfig 接口只有 4 个方法:

1
2
3
4
5
6
7
8
9
public interface ServletConfig {
String getServletName();

ServletContext getServletContext();

String getInitParameter(String var1);

Enumeration<String> getInitParameterNames();
}
  • getServletName:获取 Servlet 的名称
  • getServletContext:返回一个自身应用的 ServletContext
  • getInitParameter:获取 init-param 配置的参数
  • getInitParameterNames:获取配置的所有 init-param 的名称集合

init 方法被调用时会收到一个 ServletConfig 类型的参数,是容器传进去的。

Tomcat 中,Servlet 的 init 方法是在 org.apache.catalina.core.StandardWrapper 的 initServlet 方法中调用的,ServletConfig 传入的是 StandardWrapper(里面封装着 Servlet)的门面类 StandardWrapperFacade

getServletContext 非常重要,其返回的 ServletContext 代表着应用本身

ServletContext

ServletContext 用于与其 Servlet 容器通信的一组方法,例如,获取文件的 MIME 类型,分派请求或写入日志文件。ServletContext 对象包含在 ServletConfig 对象中,Web服务器在初始化Servlet 时提供 Servlet

Tomcat 中的 ServletContext 其实就是 ApplicationContextFacade

ServletConfig 是针对每个 Servlet 的,ServletContext 是针对所有 Servlet 的

GenericServlet

GenericServlet 是 Servlet 的默认实现,主要做了三件事:

  1. 实现了 ServletConfig 接口,可以直接调 ServletConfig 里的方法;
  2. 提供了无参的 init 方法;
  3. 提供了 log 方法

GenericServlet 实现了 ServletConfig 接口,所以需要调用 ServletConfig 中方法时可以直接调用,而不用先获取 ServletConfig 了,不过其实质还是先去获取然后调的

1
2
3
4
5
6
7
8
9
10
11
12
13
14
15
public String getServletName() {
return this.config.getServletName();
}

public ServletConfig getServletConfig() {
return this.config;
}

public Enumeration<String> getInitParameterNames() {
return this.getServletConfig().getInitParameterNames();
}

public Enumeration<String> getInitParameterNames() {
return this.getServletConfig().getInitParameterNames();
}

GenericServlet 还实现了 Servlet 的 init 方法,将 init 的传参设置给了内部变量 config,然后调用其无参的 init 方法:

1
2
3
4
5
6
7
8
private transient ServletConfig config;

public void init(ServletConfig config) throws ServletException {
this.config = config;
this.init();
}

public void init() throws ServletException {}

这样处理出于 3 个方面的目的:

  1. 将 ServletConfig 赋值给内部变量,方便调用 ServletConfig 的相关方法
  2. 后面继承写 Servlet 的时候不用关心 ServletConfig
  3. 重写 init 无参方法时不需要调用 super.init(),但是重写 init 有参方法时,需要调用 super.init(config)

GenericServlet 还提供了 2 个 log 方法,一个记录日志,一个记录异常,通常并不会使用:

1
2
3
4
5
6
7
public void log(String msg) {
this.getServletContext().log(this.getServletName() + ": " + msg);
}

public void log(String message, Throwable t) {
this.getServletContext().log(this.getServletName() + ": " + message, t);
}

GenericServlet 与具体协议无关

HttpServlet

HttpServlet 是用 HTTP 协议实现的 Servlet 的基类,写 Servlet 时直接继承它就可以了,不需要再从头实现 Servlet 接口,我们要分析的 Spring MVC 中的 DispatcherServlet 就是继承的HttpServlet。

HttpServlet 主要重写了 service 方法。在 service 方法中首先将 ServletRequest 和 ServletResponse 转换为了 HttpServletRequest 和 HttpServletResponse,然后根据 Http 请求的类型不同将请求路由到了不同的处理方法。

1
2
3
4
5
6
7
8
9
10
11
12
13
public void service(ServletRequest req, ServletResponse res) throws ServletException, IOException {
HttpServletRequest request;
HttpServletResponse response;
// 转换 req 和 res
try {
request = (HttpServletRequest)req;
response = (HttpServletResponse)res;
} catch (ClassCastException var6) {
throw new ServletException("non-HTTP request or response");
}
// 调用 http 的处理方法
this.service(request, response);
}
1
2
3
4
5
6
7
8
9
10
11
12
13
14
15
16
17
18
19
20
21
22
23
24
25
26
27
28
29
30
31
32
33
34
35
36
37
38
39
40
41
42
43
44
45
protected void service(HttpServletRequest req, HttpServletResponse resp) throws ServletException, IOException {
// 获取请求类型
String method = req.getMethod();
long lastModified;
// 将不同的请求类型路由到不同的处理方法
if (method.equals("GET")) {
lastModified = this.getLastModified(req);
if (lastModified == -1L) {
this.doGet(req, resp);
} else {
long ifModifiedSince;
try {
ifModifiedSince = req.getDateHeader("If-Modified-Since");
} catch (IllegalArgumentException var9) {
ifModifiedSince = -1L;
}

if (ifModifiedSince < lastModified / 1000L * 1000L) {
this.maybeSetLastModified(resp, lastModified);
this.doGet(req, resp);
} else {
resp.setStatus(304);
}
}
} else if (method.equals("HEAD")) {
lastModified = this.getLastModified(req);
this.maybeSetLastModified(resp, lastModified);
this.doHead(req, resp);
} else if (method.equals("POST")) {
this.doPost(req, resp);
} else if (method.equals("PUT")) {
this.doPut(req, resp);
} else if (method.equals("DELETE")) {
this.doDelete(req, resp);
} else if (method.equals("OPTIONS")) {
this.doOptions(req, resp);
} else if (method.equals("TRACE")) {
this.doTrace(req, resp);
} else {
String errMsg = lStrings.getString("http.method_not_implemented");
Object[] errArgs = new Object[]{method};
errMsg = MessageFormat.format(errMsg, errArgs);
resp.sendError(501, errMsg);
}
}

具体处理方法是 doXXX 的结构,如最常用的 doGet、doPost 就是在这里定义的。doGet、doPost、doPut 和 doDelete 方法都是模板方法,而且如果子类没有实现将抛出异常。doHead 调用了 doGet 的请求,然后返回空 body 的 Response。doOptions 和 doTrace 正常不需要使用,主要是用来做一些调试工作,doOptions 返回所有支持的处理类型的集合,正常情况下可以禁用,doTrace 是用来远程诊断服务器的,它会将接收到的 header 原封不动地返回,这种做法很可能会被黑客利用,存在安全漏洞,所以如果不是必须使用,最好禁用。由于 doOptions 和 doTrace 的功能非常固定,所以 HttpServlet 做了默认的实现。doGet代码如下(doPost、doPut、doDelete与之类似):

1
2
3
4
5
6
7
8
9
protected void doGet(HttpServletRequest req, HttpServletResponse resp) throws ServletException, IOException {
String protocol = req.getProtocol();
String msg = lStrings.getString("http.method_get_not_supported");
if (protocol.endsWith("1.1")) {
resp.sendError(405, msg);
} else {
resp.sendError(400, msg);
}
}

这就是 HttpServlet,它主要将不同的请求方式路由到了不同的处理方法。不过 Spring MVC 中由于处理思路不一样,又将所有请求合并到了统一的一个方法进行处理

Servlet 架构

Servlet 架构

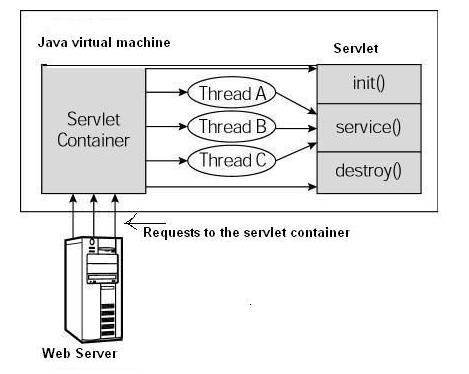
  • 第一个到达服务器的 HTTP 请求被委派到 Servlet 容器
  • Servlet 容器在调用 service() 方法之前加载 Servlet
  • 然后 Servlet 容器处理由多个线程产生的多个请求是,每个线程执行一个单一的 Servlet 实例的 service() 方法

Servlet 实例化

如果没有设置 loadOnStartup,则第一次请求的时候实例化

  • loadOnStartup < 0: web容器启动的时候不做实例化处理,servlet首次被调用时做实例化
  • loadOnStartup > 0: web容器启动的时候做实例化处理,顺序是由小到大,正整数小的先被实例化
  • loadOnStartup = 0: web容器启动的时候做实例化处理,相当于是最大整数,因此web容器启动时,最后被实例化

Servlet 容器

Wrapper

Wrapper 是第一层 Servlet 容器,Wrapper 表示 Servlet 的包装者,所以它是最接近 Servlet 的。 一个 Wrapper 对应一个 Servlet,但是 Wrapper 中不仅仅只包括一个 Servlet ,还包括过滤器( Filter )和 ServletPool

Context

Context 表示 Servlet 上下文的容器,一个 Context 对应一个 Web 应用程序 。

Host

Host 表示虚拟主机,它是根据 URL 地址中的主机部分抽象的,一个 Servlet 引擎可以包含若干个 Host 容器,而一个 Host 容器可以包含若干个 Context 容器。在 Tomcat 中 Host 的标准实现是 StandardHost,它从虚拟主机级别对请求和响应进行处理

Engine

Engine 即为全局引擎容器,它的标准实现是 StandardEngine

Servlet 容器工作流程

  1. Web Client 向 Servlet 容器(Tomcat)发出 Http 请求
  2. Servlet 容器接收 Web Client 的请求
  3. Servlet 容器创建一个 HttpRequest 对象,将 Web Client 请求的信息封装到这个对象中
  4. Servlet 容器创建一个 HttpResponse 对象
  5. Servlet 容器调用 HttpServlet 对象的 service 方法,把 HttpRequest 对象与 HttpResponse 对象作为参数传给 HttpServlet 对象
  6. HttpServlet 调用 HttpRequest 对象的有关方法,获取 Http 请求信息
  7. HttpServlet 调用 HttpResponse 对象的有关方法,生成响应数据
  8. Servlet 容器把 HttpServlet 的响应结果传给 Web Client

Spring MVC

SpringMVC 工作流程

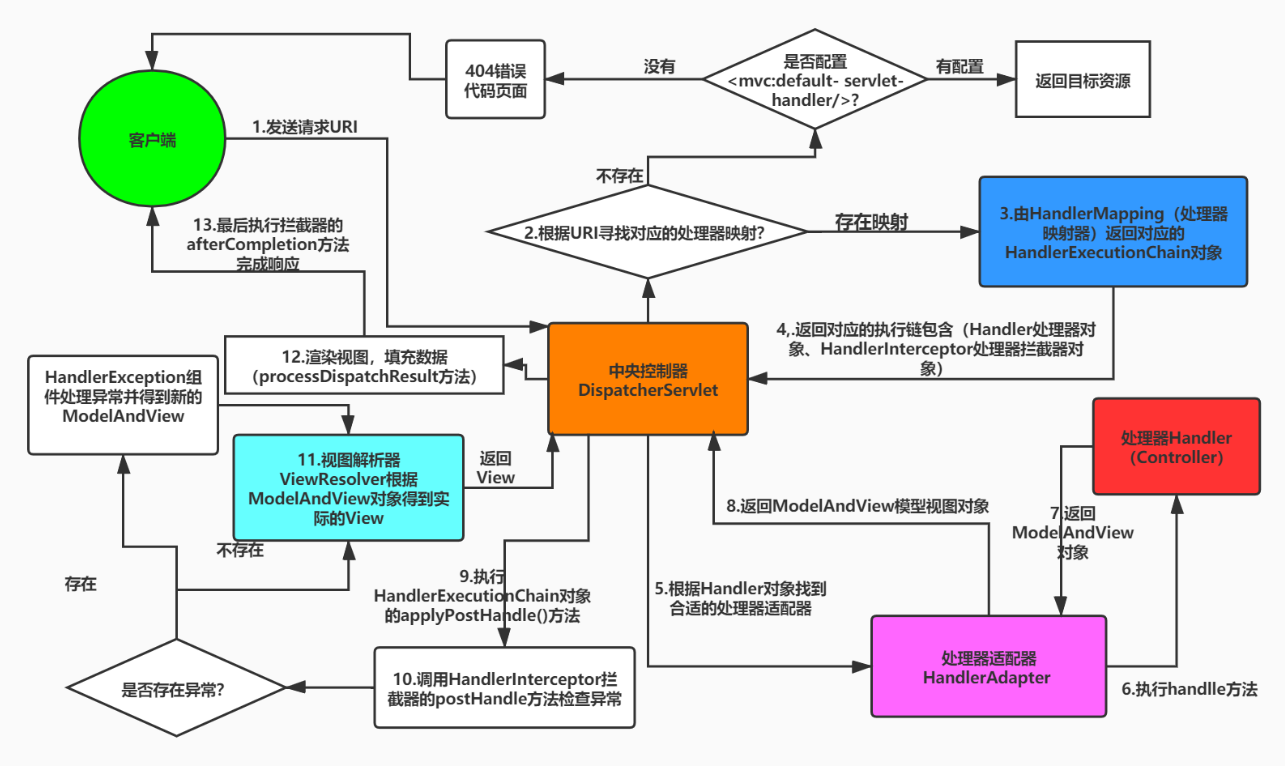
  1. 首先用户发送请求——>DispatcherServlet,前端控制器收到请求后自己不进行处理,而是委托给其他的解析器进行处理,作为统一访问点,进行全局的流程控制
  2. DispatcherServlet——>HandlerMapping,HandlerMapping 将会把请求映射为 HandlerExecutionChain 对象(包含一个 Handler 处理器(页面控制器)对象、多个 HandlerInterceptor 拦截器)对象,通过这种策略模式,很容易添加新的映射策略
  3. DispatcherServlet——>HandlerAdapter(默认有 SimpleControllerHandlerAdapter,HttpRequestHandlerAdapter 和 AnnotationMethodHandlerAdapter 几种适配器,分别对应实现 Controller 接口的类、实现 HttpRequestHandler 接口的类、注解 @RequestMapping 的方法等封装而成的对象,为不同的 handler 提供统一的访问方式)
  4. 业务处理方法(Service)
  5. HandlerAdapter 返回一个 ModelAndView 对象(包含模型数据、逻辑视图名)
  6. ModelAndView 的逻辑视图名——> ViewResolver, ViewResolver 将把逻辑视图名解析为具体的 View,通过这种策略模式,很容易更换其他视图技术
  7. View——>渲染,View 会根据传进来的 Model 模型数据进行渲染,此处的 Model 实际是一个 Map 数据结构,因此很容易支持其他视图技术
  8. 返回控制权给 DispatcherServlet,由 DispatcherServlet 返回响应给用户,到此一个流程结束

各组件功能说明:

组件 说明
DispatcherServlet 本质上是一个 HttpServlet,Servlet 容器会把请求委托给它。Spring MVC 的核心组件,是请求的入口,负责协调各个组件工作
Handler 处理器,本质上是由实现 Controller 接口的类、实现 HttpRequestHandler 接口的类、注解@RequestMapping 的方法等封装而成的对象
HandlerMapping 内部维护了一些 <访问路径, 处理器> 映射,负责为请求找到合适的处理器
HandlerAdapter 处理器的适配器。Spring 中的处理器的实现多变,比如用户处理器可以实现 Controller 接口,实现 HttpRequestHandler 接口,也可以用 @RequestMapping 注解将方法作为一个处理器等,这就导致 Spring 不知道怎么调用用户的处理器逻辑。所以这里需要一个处理器适配器,由处理器适配器去调用处理器的逻辑
ViewResolver 用于将视图名称解析为视图对象 View
View 在视图对象用于将模板渲染成 html 或其他类型的文件。比如 InternalResourceView 可将 jsp 渲染成 html

可以很直观的看出,SpringMVC 的核心便是 DispatcherServlet

DispatcherServlet 寻踪觅迹

直接查看 DispatchServlet 的源码可以发现:

DispatchServlet 继承关系

DispatcherServlet 的本质就是一个 Servlet

Aware

在 Spring 中,Aware 类型的接口用于向 Spring 「索要」一些框架中的信息。比如当某个 bean 实现了 ApplicationContextAware 接口时,Spring 在运行时会将当前的 ApplicationContext 实例通过接口方法 setApplicationContext 传给该 bean

1
2
3
4
5
6
7
8
9
10
11
12
13
14
15
16
17
18
19
20
21
22
23
24
25
26
27
28
29
30
31
32
33
34
35
36
37
38
39
40
41
42
43
44
45
46
47
48
49
50
51
52
53
54
55
56
57
58
59
@Component
public class SpringContextUtils implements ApplicationContextAware {

/**
* 上下文对象实例
*/
private static ApplicationContext applicationContext;


/**
* 获取applicationContext
*
* @return
*/
public static ApplicationContext getApplicationContext() {
return SpringContextUtils.applicationContext;
}

/**
* 通过name获取 Bean.
*
* @param name
* @return
*/
public static Object getBean(String name) {
return getApplicationContext().getBean(name);
}

/**
* 通过class获取Bean.
*
* @param clazz
* @param <T>
* @return
*/
public static <T> T getBean(Class<T> clazz) {
return getApplicationContext().getBean(clazz);
}

/**
* 通过name,以及Clazz返回指定的Bean
*
* @param name
* @param clazz
* @param <T>
* @return
*/
public static <T> T getBean(String name, Class<T> clazz) {
return getApplicationContext().getBean(name, clazz);
}

@Override
public void setApplicationContext(ApplicationContext applicationContext) throws BeansException {
if(SpringContextUtils.applicationContext == null) {
SpringContextUtils.applicationContext = applicationContext;
}
}
}

上面这个常见的例子就是通过实现 ApplicationContextAware 接口获取 ApplicationContext 从而用作获取 Bean 的一个工具类

EnvironmentAware

EnvironmentAware 可以获取配置信息以及系统环境变量和系统参数信息

1
2
3
4
5
6
7
8
9
10
11
12
13
14
15
16
@GetMapping("/")
public String index() {
StandardServletEnvironment sse = (StandardServletEnvironment) environment;
StringBuilder sb = new StringBuilder();
sb.append("SystemEnvironment").append("\n");
Map<String, Object> systemEnvironment = sse.getSystemEnvironment();
if (Objects.nonNull(systemEnvironment)) {
systemEnvironment.forEach((k, v) -> sb.append(k).append(":").append(v).append("\n"));
}
sb.append("SystemProperties").append("\n");
Map<String, Object> systemProperties = sse.getSystemProperties();
if (Objects.nonNull(systemProperties)) {
systemProperties.forEach((k, v) -> sb.append(k).append(":").append(v).append("\n"));
}
return sb.toString();
}

常见的用法就是获取配置:

1
2
3
4
@GetMapping("/{properties}")
public String getProperties(@PathVariable("properties") String properties) {
return environment.getProperty(properties);
}

EnvironmentCapable

EnvironmentCapable 仅包含一个方法定义 getEnvironment,通过该方法可以获取到环境变量对象。我们可以将 EnvironmentCapable 和 EnvironmentAware 接口配合使用:

1
2
3
4
5
6
7
8
9
10
11
12
13
14
public class EnvironmentHolder implements EnvironmentCapable, EnvironmentAware {

private Environment environment;

@Override
public void setEnvironment(Environment environment) {
this.environment = environment;
}

@Override
public Environment getEnvironment() {
return environment;
}
}

HttpServletBean

HttpServletBean 是 HttpServlet 抽象类的简单拓展。HttpServletBean 覆写了父类中的无参 init 方法,并在该方法中将 ServletConfig 里的配置信息设置到子类对象中,比如 DispatcherServlet 。最后调用模板方法 initServletBean,子类通过该方法初始化

FrameworkServlet

承接上面,FrameworkServlet 通过 initServletBean 方法初始化,其核心方法为 initWebApplicationContext 用于初始化 WebApplicationContext:

1
2
3
4
5
6
7
8
9
10
11
12
13
14
15
16
17
18
19
20
21
22
23
24
25
26
27
28
29
30
31
32
33
34
35
36
37
38
39
40
41
42
43
44
45
protected WebApplicationContext initWebApplicationContext() {
// 获取 rootContext
WebApplicationContext rootContext = WebApplicationContextUtils.getWebApplicationContext(this.getServletContext());
WebApplicationContext wac = null;
// 如果已经通过构造方法设置过了 webApplicationContext
if (this.webApplicationContext != null) {
wac = this.webApplicationContext;
if (wac instanceof ConfigurableWebApplicationContext) {
ConfigurableWebApplicationContext cwac = (ConfigurableWebApplicationContext)wac;
if (!cwac.isActive()) {
if (cwac.getParent() == null) {
cwac.setParent(rootContext);
}

this.configureAndRefreshWebApplicationContext(cwac);
}
}
}

if (wac == null) {
// 当 webApplicationContext 已经存在 ServletContext 中时,通过配置在 Servlet 中的 contextAttribute 参数获取
wac = this.findWebApplicationContext();
}

if (wac == null) {
// 如果 webApplicationContext 还没创建,则创建一个
wac = this.createWebApplicationContext(rootContext);
}

if (!this.refreshEventReceived) {
// 当 ContextRefreshEvent 事件没有触发时调用此方法,模板方法,子类重写
this.onRefresh(wac);
}

if (this.publishContext) {
// 将 ApplicationContext 保存到 ServletContext 中
String attrName = this.getServletContextAttributeName();
this.getServletContext().setAttribute(attrName, wac);
if (this.logger.isDebugEnabled()) {
this.logger.debug("Published WebApplicationContext of servlet '" + this.getServletName() + "' as ServletContext attribute with name [" + attrName + "]");
}
}

return wac;
}

initWebApplicationContext 方法做了三件事:

  • 获取 Spring 的根容器 rootContext
  • 设置 webApplicationContext 并根据情况调用 onRefresh 方法
  • 将 webApplicationContext 设置到 Servlet Context中
获取 Spring 的根容器 rootContext

默认情况下 Spring 会将自己的容器设置成 ServletContext 的属性,默认根容器的 key 为:

org.springframework.web.context.WebApplicationContext.ROOT,定义在 WebApplicationContext 中:

1
String ROOT_WEB_APPLICATION_CONTEXT_ATTRIBUTE = WebApplicationContext.class.getName() + ".ROOT";

所以获取根容器只需要调用 ServletContex t的 getAttribute 就可以了:

ServletContext#getAttribute("org.springframework.web.context.WebApplicationContext.ROOT")

设置 webApplicationContext 并根据情况调用 onRefresh 方法

设置 webApplicationContext 一共有三种方法

第一种方法是在构造方法中已经传递 webApplicationContext 参数,这时只需要对其进行一些设置即可。这种方法主要用于 Servlet3.0 以后的环境中,Servlet3.0 之后可以在程序中使用ServletContext.addServlet 方式注册 Servlet,这时就可以在新建 FrameworkServlet 和其子类的时候通过构成方法传递已经准备好的 webApplicationContext

第二种方法是 webApplicationContext 已经在 ServletContext 中了。这时只需要在配置 Servlet 的时候将 ServletContext 中的 webApplicationContext 的 name 配置到 contextAttribute 属性就可以了。比如,在 ServletContext 中有一个叫 haha 的 webApplicationContext,可以这么将它配置到Spring MVC 中:

1
2
3
4
5
6
7
8
9
10
<!--Web.xml -->
<servlet>
<servlet-name>let'sGo</servlet-name>
<servlet-class>org.springframework.web.servlet.DispatcherServlet</servlet-class>
<init-param>
<param-name>contextAttribute</param-name>
<param-value>haha</param-value>
</init-param>
<load-on-startup>1</load-on-startup>
</servlet>

第三种方法是在前面两种方式都无效的情况下自己创建一个。正常情况下就是使用的这种方式。创建过程在 createWebApplicationContext 方法中,createWebApplicationContext 内部又调用了 configureAndRefreshWebApplicationContext 方法:

1
2
3
4
5
6
7
8
9
10
11
12
13
14
15
16
17
18
19
20
21
22
23
24
25
26
27
28
29
30
31
32
33
34
35
36
37
38
39
40
41
42
43
44
45
protected WebApplicationContext createWebApplicationContext(ApplicationContext parent) {
// 获取创建类型,默认 XmlWebApplicationContext.class
Class<?> contextClass = this.getContextClass();
if (this.logger.isDebugEnabled()) {
this.logger.debug("Servlet with name '" + this.getServletName() + "' will try to create custom WebApplicationContext context of class '" + contextClass.getName() + "', using parent context [" + parent + "]");
}

// 检查创建类型
if (!ConfigurableWebApplicationContext.class.isAssignableFrom(contextClass)) {
throw new ApplicationContextException("Fatal initialization error in servlet with name '" + this.getServletName() + "': custom WebApplicationContext class [" + contextClass.getName() + "] is not of type ConfigurableWebApplicationContext");
} else {
// 开始创建
ConfigurableWebApplicationContext wac = (ConfigurableWebApplicationContext)BeanUtils.instantiateClass(contextClass);
wac.setEnvironment(this.getEnvironment());
wac.setParent(parent);
// 将设置的 contextConfigLocation 参数传给 wac,默认传入:WEB-INFO/[ServletName]-Servlet.xml
wac.setConfigLocation(this.getContextConfigLocation());
this.configureAndRefreshWebApplicationContext(wac);
return wac;
}
}

protected void configureAndRefreshWebApplicationContext(ConfigurableWebApplicationContext wac) {
if (ObjectUtils.identityToString(wac).equals(wac.getId())) {
if (this.contextId != null) {
wac.setId(this.contextId);
} else {
wac.setId(ConfigurableWebApplicationContext.APPLICATION_CONTEXT_ID_PREFIX + ObjectUtils.getDisplayString(this.getServletContext().getContextPath()) + '/' + this.getServletName());
}
}

wac.setServletContext(this.getServletContext());
wac.setServletConfig(this.getServletConfig());
wac.setNamespace(this.getNamespace());
// 添加监听 ContextRefreshedEvent 的监听器
wac.addApplicationListener(new SourceFilteringListener(wac, new ContextRefreshListener()));
ConfigurableEnvironment env = wac.getEnvironment();
if (env instanceof ConfigurableWebEnvironment) {
((ConfigurableWebEnvironment)env).initPropertySources(this.getServletContext(), this.getServletConfig());
}

this.postProcessWebApplicationContext(wac);
this.applyInitializers(wac);
wac.refresh();
}

SourceFilteringListener 可以根据输入的参数进行选择,所以实际监听的是 ContextRefreshListener 所监听的事件。ContextRefreshListener 是 FrameworkServlet 的内部类,监听 Context-RefreshedEvent 事件,当接收到消息时调用 FrameworkServlet 的 onApplicationEvent 方法,在 onApplicationEvent 中会调用一次 onRefresh 方法,并将 refreshEventReceived 标志设置为 true ,表示已经 refresh 过

1
2
3
4
5
6
7
8
9
10
11
12
13
private class ContextRefreshListener implements ApplicationListener<ContextRefreshedEvent> {
private ContextRefreshListener() {
}

public void onApplicationEvent(ContextRefreshedEvent event) {
FrameworkServlet.this.onApplicationEvent(event);
}
}

public void onApplicationEvent(ContextRefreshedEvent event) {
this.refreshEventReceived = true;
this.onRefresh(event.getApplicationContext());
}

当使用第三种方法初始化时已经 refresh,上面 initWebApplicationContext 方法就不需要再调用 onRefresh。 同样在第一种方式中也调用了 configureAndRefreshWebApplicationContext 方法,也 refresh 过,只有 第二种方式初始化 webApplicationContext 的时候才会在 initWebApplicationContext 中调用 onRefresh 方法。不过不管用哪种方式调用,onRefresh 最终肯定只会有且调用一次,而且 DispatcherServlet 正是通过重写这个模板方法来实现初始化的

将 webApplicationContext 设置到 Servlet Context中

最后会根据 publishContext 标志判断是否将创建出来的 webApplicationContext 设置到 ServletContext 的属性中,publishContext 标志可以在配置 Servlet 时通过 initParam 参数进行设置,HttpServletBean 初始化时会将其设置到 publishContext 参数。之所以将创建出来的 webApplicationContext 设置到 ServletContext 的属性中,主要是为了方便获取,在前面获取 RootApplicationContext 的时候已经介绍过

DispatcherServlet

承接上面,onRefresh 方法进入到 DispatcherServlet,onRefresh 中直接调用 initStrategies 进行初始化:

1
2
3
4
5
6
7
8
9
10
11
12
13
14
15
protected void onRefresh(ApplicationContext context) {
this.initStrategies(context);
}

protected void initStrategies(ApplicationContext context) {
this.initMultipartResolver(context);
this.initLocaleResolver(context);
this.initThemeResolver(context);
this.initHandlerMappings(context);
this.initHandlerAdapters(context);
this.initHandlerExceptionResolvers(context);
this.initRequestToViewNameTranslator(context);
this.initViewResolvers(context);
this.initFlashMapManager(context);
}

这里分为两个方法,主要出于一下考虑:

  • 独立刷新容器与初始化组件
  • onRefresh 中添加新功能,不影响 initStrategies

DispatcherServlet 除了协调各个组件工作,还有一个重要的职责,就是初始化各个组件,如 HandlerMapping、HandlerAdapter 等

Thanks