AQS 详解
2024-09-30 08:00:49 # Technical # JavaConcurrency

AQS(AbstractQueuedSynchronizer)是 java.util.concurrent.locks 包中的一个抽象类,简称「抽象队列同步器」,它是 Java 并发编程的核心组件之一,广泛用于实现同步器,例如 ReentrantLockSemaphoreCountDownLatchCyclicBarrier 等常见并发工具

AQS 的作用

AQS 主要用于构建锁或者其他同步器,它提供了一套通用机制来管理共享资源的访问,并为实现自定义的同步工具提供了基础。AQS 通过 CLH 队列来管理线程的排队,支持两种访问模式:

  • 独占模式(Exclusive Mode):一次只有一个线程能够访问共享资源,典型实现如:ReentrantLock
  • 共享模式(Shared Mode):多个线程可以同时访问共享资源,典型实现如:SemaphoreCountDownLatch

CLH (Craig, Landin, Hagersten) 队列是一个虚拟的双向队列(不存在队列实例,仅存在节点之间的关联关系)AQS 将每条请求共享资源的线程都封装成一个 CLH 队列的节点来实现对锁的分配

AQS 核心原理

AQS 依赖于一个 volatile 类型的整数变量(state)来表示共享资源的状态,并通过一系列的原子操作来改变这个状态。线程通过对 state 的操作来判断是否能获取锁或者访问共享资源。如果当前线程不能获取锁,就会被挂起并加入等待队列,等待条件满足时被唤醒

1
2
3
4
5
6
7
8
9
10
11
12
13
14
15
// 共享变量,使用 volatile 修饰保证线程可见性
private volatile int state;

// 返回同步状态的当前值
protected final int getState() {
return state;
}
// 设置同步状态的值
protected final void setState(int newState) {
state = newState;
}
// 通过 CAS 更新状态
protected final boolean compareAndSetState(int expect, int update) {
return unsafe.compareAndSwapInt(this, stateOffset, expect, update);
}

AQS 是一个抽象类,它为子类提供了模板方法,子类通过覆盖这些方法来实现自定义的同步器

AQS 工作流程

  1. 当线程请求获取资源时,首先尝试获取同步状态(state)
  2. 如果获取失败,AQS 会将该线程封装成一个 Node 对象,并将其加入等待队列的尾部
  3. 然后,线程会被阻塞
  4. 当持有资源的线程释放资源时,它会唤醒等待队列中的下一个线程
  5. 被唤醒的线程会尝试获取资源,如果成功则从等待队列中移除,否则继续等待

AQS 主要方法

  • **acquire(int arg)**:以独占模式获取资源
  • **release(int arg)**:以独占模式释放资源
  • **acquireShared(int arg)**:以共享模式获取资源
  • **releaseShared(int arg)**:以共享模式释放资源
  • **tryAcquire(int arg)**:尝试以独占模式获取资源(模板方法,由子类实现)
  • **tryRelease(int arg)**:尝试以独占模式释放资源(模板方法,由子类实现)
  • **tryAcquireShared(int arg)**:尝试以共享模式获取资源(模板方法,由子类实现)
  • **tryReleaseShared(int arg)**:尝试以共享模式释放资源(模板方法,由子类实现)

AQS 简单示例

用 AQS 实现一个简单的二元信号量

1
2
3
4
5
6
7
8
9
10
11
12
13
14
15
16
17
18
19
20
21
22
23
24
25
26
27
28
29
30
31
32
33
34
35
36
37
38
public static void main(String[] args) {
BinarySemaphore semaphore = new BinarySemaphore();
for (int i = 1; i < 11; i++) {
new Thread(() -> {
try {
semaphore.acquire(1);
System.out.println(Thread.currentThread().getName() + " acquired the semaphore");
Thread.sleep(1000); // Simulating some work
System.out.println(Thread.currentThread().getName() + " releasing the semaphore");
semaphore.release(1);
} catch (Exception e) {
System.err.println(Thread.currentThread().getName() + e.getMessage());
}
}, "Thread-" + i).start();
}
}

private static class BinarySemaphore extends AbstractQueuedSynchronizer {

@Override
protected boolean tryAcquire(int acquires) {
assert acquires == 1;
if (compareAndSetState(0, 1)) {
setExclusiveOwnerThread(Thread.currentThread());
return true;
}
return false;
}

@Override
protected boolean tryRelease(int releases) {
assert releases == 1;
if (getState() == 0) throw new IllegalMonitorStateException();
setExclusiveOwnerThread(null);
setState(0);
return true;
}
}

AQS 源码解析

关键属性

1
2
3
4
5
6
7
8
9
10
11
12
13
14
// 头结点,你直接把它当做 当前持有锁的线程 可能是最好理解的
private transient volatile Node head;

// 阻塞的尾节点,每个新的节点进来,都插入到最后,也就形成了一个链表
private transient volatile Node tail;

// 这个是最重要的,代表当前锁的状态,0 代表没有被占用,大于 0 代表有线程持有当前锁
// 这个值可以大于 1,是因为锁可以重入,每次重入都加上 1
private volatile int state;

// 代表当前持有独占锁的线程,举个最重要的使用例子,因为锁可以重入
// reentrantLock.lock()可以嵌套调用多次,所以每次用这个来判断当前线程是否已经拥有了锁
// if (currentThread == getExclusiveOwnerThread()) {state++}
private transient Thread exclusiveOwnerThread; //继承自AbstractOwnableSynchronizer

AQS 队列结构

如前面所说,AQS 中的队列是一个虚拟队列,这个队列是没有实例的,不包含 head,只有节点间的关联关系

关键内部类

队列中的每个节点都是一个线程也对应着一个内部类 Node 的实例

1
2
3
4
5
6
7
8
9
10
11
12
13
14
15
16
17
18
19
20
21
22
23
24
25
26
27
28
29
30
31
32
33
34
35
36
37
38
39
40
41
42
43
44
45
46
47
48
49
50
51
52
53
54
55
56
57
58
59
60
static final class Node {
// 标记一个节点在共享模式下等待
static final Node SHARED = new Node();
// 标记一个节点在独占模式下等待
static final Node EXCLUSIVE = null;

// waitStatus 的值,节点已被取消
static final int CANCELLED = 1;
// waitStatus 的值,节点的 next 节点需要被唤醒(unpark)
static final int SIGNAL = -1;
// waitStatus 的值,节点在等待 condition(在 condition 队列中)
static final int CONDITION = -2;
// waitStatus 的值,有资源可用,新 head 节点需要继续唤醒后继节点
// 共享模式下,多线程并发释放资源,head 唤醒其后继节点后,需要把多出来的资源留给后面的节点
// 设置新的 head 节点时,会继续唤醒其后继节点
static final int PROPAGATE = -3;

// 等待状态,取上述值:1,0,-1,-2,-3
// 还有个默认值 0 没有在上面声明出来,用来表示当前节点在同步队列中,等待获取锁
volatile int waitStatus;

// 指向前节点
volatile Node prev;

// 指向后节点
volatile Node next;

// 节点对应的线程
volatile Thread thread;

// 等待队列里的下一个等待条件的节点
Node nextWaiter;

// 判断节点是否在共享模式下等待
final boolean isShared() {
return nextWaiter == SHARED;
}

// 获取前节点,如果前节点为 null,抛出 NPE
final Node predecessor() throws NullPointerException {
Node p = prev;
if (p == null)
throw new NullPointerException();
else
return p;
}

Node() { // Used to establish initial head or SHARED marker
}

Node(Thread thread, Node mode) { // Used by addWaiter
this.nextWaiter = mode;
this.thread = thread;
}

Node(Thread thread, int waitStatus) { // Used by Condition
this.waitStatus = waitStatus;
this.thread = thread;
}
}

内部类 ConditionObject 作为 Lock 的实现基础,实现了 Condition 接口

先看下 Condition 接口

1
2
3
4
5
6
7
8
9
10
11
12
13
14
15
16
17
18
19
20
21
22
23
24
25
26
27
28
29
30
31
32
/**
* Condition 将 Object 监视器方法(wait、notify/notifyAll)分解为不同的对象,
* 通过将它们与任意 `java.util.concurrent.locks.Lock` 的实现相结合,
* 实现对每个对象具有多个等待集的效果。Lock 取代了 synchronized 方法和语句的使用,
* Lock 和 Condition 取代了 Object 监视器方法的使用。
* Condition 为一个线程提供了一种暂停执行(等待)的方法,直到另一个线程通知某个状态
* 条件现在可能为 true。由于对这些共享状态信息的访问发生在不同的线程中,因此必须对其
* 进行保护,所以以某种形式的锁与条件相关联。
*/
public interface Condition {

// 等待,当前线程在接到信号或被中断之前一直处于等待状态
void await() throws InterruptedException;

// 等待,当前线程在接到信号之前一直处于等待状态,不响应中断
void awaitUninterruptibly();

//等待,当前线程在接到信号、被中断或到达指定等待时间之前一直处于等待状态
long awaitNanos(long nanosTimeout) throws InterruptedException;

// 等待,当前线程在接到信号、被中断或到达指定等待时间之前一直处于等待状态。此方法在行为上等效于: awaitNanos(unit.toNanos(time)) > 0
boolean await(long time, TimeUnit unit) throws InterruptedException;

// 等待,当前线程在接到信号、被中断或到达指定最后期限之前一直处于等待状态
boolean awaitUntil(Date deadline) throws InterruptedException;

// 唤醒一个等待线程。如果所有的线程都在等待此条件,则选择其中的一个唤醒。在从 await 返回之前,该线程必须重新获取锁。
void signal();

// 唤醒所有等待线程。如果所有的线程都在等待此条件,则唤醒所有线程。在从 await 返回之前,每个线程都必须重新获取锁。
void signalAll();
}
1
2
3
4
5
6
7
8
9
10
11
12
13
14
15
16
17
18
19
20
21
22
23
24
25
26
27
28
29
30
31
32
33
34
35
36
37
38
39
40
41
42
43
44
45
46
47
48
49
50
51
52
53
54
55
56
57
58
59
60
61
62
63
64
65
66
67
68
69
70
71
72
73
74
75
76
77
78
79
80
81
82
83
84
85
86
87
88
89
90
91
92
93
94
95
96
97
98
99
100
101
102
103
104
105
106
107
108
109
110
111
112
113
114
115
116
117
118
119
120
121
122
123
124
125
126
127
128
129
130
131
132
133
134
135
136
137
138
139
140
141
142
143
144
145
146
147
148
149
150
151
152
153
154
155
156
157
158
159
160
161
162
163
164
165
166
167
168
169
170
171
172
173
174
175
176
177
178
179
180
181
182
183
184
185
186
187
188
189
190
191
192
193
194
195
196
197
198
199
200
201
202
203
204
205
206
207
208
209
210
211
212
213
214
215
216
217
218
219
220
221
222
223
224
225
226
227
228
229
230
231
232
233
234
235
236
237
238
239
240
241
242
243
244
245
246
247
248
249
250
251
252
253
254
255
256
257
258
259
260
261
262
263
264
265
266
267
268
269
270
271
272
273
274
275
276
277
278
279
280
281
282
283
284
285
286
287
288
289
290
291
292
293
294
295
296
297
298
299
300
301
302
303
304
305
306
307
308
309
310
311
312
313
314
315
316
317
318
319
320
321
322
323
324
325
326
327
328
329
330
331
332
333
334
335
336
337
338
339
340
341
342
343
344
345
346
347
348
349
350
351
352
public class ConditionObject implements Condition, java.io.Serializable {
private static final long serialVersionUID = 1173984872572414699L;
// condition 队列头节点
private transient Node firstWaiter;
// condition 队列尾节点
private transient Node lastWaiter;

public ConditionObject() { }

// 添加新的 waiter 到 condition 队列
private Node addConditionWaiter() {
Node t = lastWaiter;
// 如果尾节点不为空,且状态不为 CONDITION(-2)
if (t != null && t.waitStatus != Node.CONDITION) {
// 清除状态为 CONDITION 的节点
unlinkCancelledWaiters();
// 将最后一个节点重新赋值给 t
t = lastWaiter;
}
// 新建一个状态为 CONDITION 的节点
Node node = new Node(Thread.currentThread(), Node.CONDITION);
if (t == null)
// 尾节点为 null,就将这个新节点设置为头节点
firstWaiter = node;
else
// 否则将尾节点指向新节点
t.nextWaiter = node;
// 更新尾节点为新的节点
lastWaiter = node;
return node;
}

/**
* 唤醒在条件队列上等待的线程,通常在使用 Condition 的 signal 方法时被调用。
* 这使得等待的线程可以尝试重新获得锁,并继续执行它们的任务
*/
private void doSignal(Node first) {
do {
// first 表示当前待唤醒的节点
// firstWaiter 表示下一个等待的节点
// 如果下一个等待的节点为 null,说明当前节点是队列中最后一个节点,设置尾节点为 null
if ( (firstWaiter = first.nextWaiter) == null)
lastWaiter = null;
// 「断开」first指向下个节点
first.nextWaiter = null;
// 尝试将 first 状态转为可运行状态,如果转移失败则继续唤醒下一个节点
} while (!transferForSignal(first) &&
(first = firstWaiter) != null);
}

/**
* 唤醒所有节点
*/
private void doSignalAll(Node first) {
// 头尾节点都设置为 null
lastWaiter = firstWaiter = null;
// 循环唤醒每个节点
do {
Node next = first.nextWaiter;
first.nextWaiter = null;
transferForSignal(first);
first = next;
} while (first != null);
}

/**
* 清除 condition 队列中状态为 CANCEL 的节点
*/
private void unlinkCancelledWaiters() {
Node t = firstWaiter;
// 下一个等待节点
Node trail = null;
while (t != null) {
Node next = t.nextWaiter;
// 判断节点状态是否是 CONDITION
if (t.waitStatus != Node.CONDITION) {
t.nextWaiter = null;
// 如果下一个等待节点是 null,直接设置头节点为 next
// 否则设置 next 为下一个等待节点的 nextWaiter
if (trail == null)
firstWaiter = next;
else
trail.nextWaiter = next;
// 下一个节点为 null,设置下个等待节点为尾节点
if (next == null)
lastWaiter = trail;
}
// 如果 t 的状态为 CONDITION,设置下一个等待节点 trail 为 t
else
trail = t;
// 往下遍历
t = next;
}
}

// public methods

/**
* 唤醒一个等待线程,如果所有线程都在等待此条件,选择其中任意一个进行唤醒
* 在从 await 返回之前,该线程必须重新获取锁
*/
public final void signal() {
// 检查是否被当前线程独占
if (!isHeldExclusively())
throw new IllegalMonitorStateException();
Node first = firstWaiter;
if (first != null)
// 唤醒一个等待线程
doSignal(first);
}

/**
* 唤醒所有等待线程,如果所有的线程都在等待此条件,则唤醒所有线程
* 在从 await 返回之前,每个线程必须重新获取锁
*/
public final void signalAll() {
if (!isHeldExclusively())
throw new IllegalMonitorStateException();
Node first = firstWaiter;
if (first != null)
doSignalAll(first);
}

/**
* 等待,在当前线程接收到信号之前一直处于等待状态,不响应中断
*/
public final void awaitUninterruptibly() {
// 添加一个节点到等待队列
Node node = addConditionWaiter();
// 获取释放的状态
int savedState = fullyRelease(node);
boolean interrupted = false;
// 循环阻塞
while (!isOnSyncQueue(node)) {
LockSupport.park(this);
if (Thread.interrupted())
interrupted = true;
}
if (acquireQueued(node, savedState) || interrupted)
selfInterrupt();
}

/**
* For interruptible waits, we need to track whether to throw
* InterruptedException, if interrupted while blocked on
* condition, versus reinterrupt current thread, if
* interrupted while blocked waiting to re-acquire.
*/

/** Mode meaning to reinterrupt on exit from wait */
private static final int REINTERRUPT = 1;
/** Mode meaning to throw InterruptedException on exit from wait */
private static final int THROW_IE = -1;

/**
* Checks for interrupt, returning THROW_IE if interrupted
* before signalled, REINTERRUPT if after signalled, or
* 0 if not interrupted.
*/
private int checkInterruptWhileWaiting(Node node) {
return Thread.interrupted() ?
(transferAfterCancelledWait(node) ? THROW_IE : REINTERRUPT) :
0;
}

/**
* Throws InterruptedException, reinterrupts current thread, or
* does nothing, depending on mode.
*/
private void reportInterruptAfterWait(int interruptMode)
throws InterruptedException {
if (interruptMode == THROW_IE)
throw new InterruptedException();
else if (interruptMode == REINTERRUPT)
selfInterrupt();
}

/**
* 可中断的条件等待
*/
public final void await() throws InterruptedException {
if (Thread.interrupted())
throw new InterruptedException();
// 新增等待节点
Node node = addConditionWaiter();
int savedState = fullyRelease(node);
int interruptMode = 0;
// 循环阻塞
while (!isOnSyncQueue(node)) {
LockSupport.park(this);
if ((interruptMode = checkInterruptWhileWaiting(node)) != 0)
break;
}
if (acquireQueued(node, savedState) && interruptMode != THROW_IE)
interruptMode = REINTERRUPT;
if (node.nextWaiter != null) // clean up if cancelled
unlinkCancelledWaiters();
if (interruptMode != 0)
reportInterruptAfterWait(interruptMode);
}

/**
* 指定等待时间的等待
*/
public final long awaitNanos(long nanosTimeout)
throws InterruptedException {
if (Thread.interrupted())
throw new InterruptedException();
Node node = addConditionWaiter();
int savedState = fullyRelease(node);
final long deadline = System.nanoTime() + nanosTimeout;
int interruptMode = 0;
while (!isOnSyncQueue(node)) {
if (nanosTimeout <= 0L) {
transferAfterCancelledWait(node);
break;
}
if (nanosTimeout >= spinForTimeoutThreshold)
// 本质是通过 parkNanos 方法实现
LockSupport.parkNanos(this, nanosTimeout);
if ((interruptMode = checkInterruptWhileWaiting(node)) != 0)
break;
nanosTimeout = deadline - System.nanoTime();
}
if (acquireQueued(node, savedState) && interruptMode != THROW_IE)
interruptMode = REINTERRUPT;
if (node.nextWaiter != null)
unlinkCancelledWaiters();
if (interruptMode != 0)
reportInterruptAfterWait(interruptMode);
return deadline - System.nanoTime();
}

/**
* 等待直到指定的时间
*/
public final boolean awaitUntil(Date deadline)
throws InterruptedException {
long abstime = deadline.getTime();
if (Thread.interrupted())
throw new InterruptedException();
Node node = addConditionWaiter();
int savedState = fullyRelease(node);
boolean timedout = false;
int interruptMode = 0;
while (!isOnSyncQueue(node)) {
if (System.currentTimeMillis() > abstime) {
timedout = transferAfterCancelledWait(node);
break;
}
LockSupport.parkUntil(this, abstime);
if ((interruptMode = checkInterruptWhileWaiting(node)) != 0)
break;
}
if (acquireQueued(node, savedState) && interruptMode != THROW_IE)
interruptMode = REINTERRUPT;
if (node.nextWaiter != null)
unlinkCancelledWaiters();
if (interruptMode != 0)
reportInterruptAfterWait(interruptMode);
return !timedout;
}

/**
* 等待指定的时间
*/
public final boolean await(long time, TimeUnit unit)
throws InterruptedException {
long nanosTimeout = unit.toNanos(time);
if (Thread.interrupted())
throw new InterruptedException();
Node node = addConditionWaiter();
int savedState = fullyRelease(node);
final long deadline = System.nanoTime() + nanosTimeout;
boolean timedout = false;
int interruptMode = 0;
while (!isOnSyncQueue(node)) {
if (nanosTimeout <= 0L) {
timedout = transferAfterCancelledWait(node);
break;
}
if (nanosTimeout >= spinForTimeoutThreshold)
LockSupport.parkNanos(this, nanosTimeout);
if ((interruptMode = checkInterruptWhileWaiting(node)) != 0)
break;
nanosTimeout = deadline - System.nanoTime();
}
if (acquireQueued(node, savedState) && interruptMode != THROW_IE)
interruptMode = REINTERRUPT;
if (node.nextWaiter != null)
unlinkCancelledWaiters();
if (interruptMode != 0)
reportInterruptAfterWait(interruptMode);
return !timedout;
}

// support for instrumentation

/**
* Returns true if this condition was created by the given
* synchronization object.
*
* @return {@code true} if owned
*/
final boolean isOwnedBy(AbstractQueuedSynchronizer sync) {
return sync == AbstractQueuedSynchronizer.this;
}

/**
* 查询是否有正在等待此条件的任何线程
*/
protected final boolean hasWaiters() {
if (!isHeldExclusively())
throw new IllegalMonitorStateException();
for (Node w = firstWaiter; w != null; w = w.nextWaiter) {
if (w.waitStatus == Node.CONDITION)
return true;
}
return false;
}

/**
* 返回正在等待此条件的线程数估计值
*/
protected final int getWaitQueueLength() {
if (!isHeldExclusively())
throw new IllegalMonitorStateException();
int n = 0;
for (Node w = firstWaiter; w != null; w = w.nextWaiter) {
if (w.waitStatus == Node.CONDITION)
++n;
}
return n;
}

/**
* 返回包含那些可能正在等待此条件的线程集合
*/
protected final Collection<Thread> getWaitingThreads() {
if (!isHeldExclusively())
throw new IllegalMonitorStateException();
ArrayList<Thread> list = new ArrayList<Thread>();
for (Node w = firstWaiter; w != null; w = w.nextWaiter) {
if (w.waitStatus == Node.CONDITION) {
Thread t = w.thread;
if (t != null)
list.add(t);
}
}
return list;
}
}
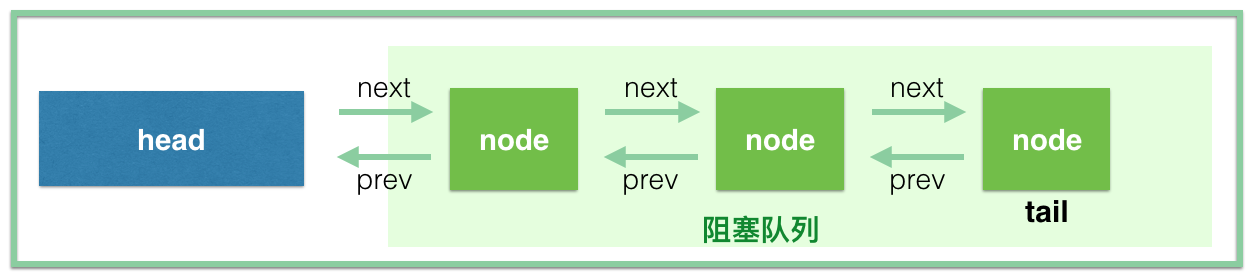
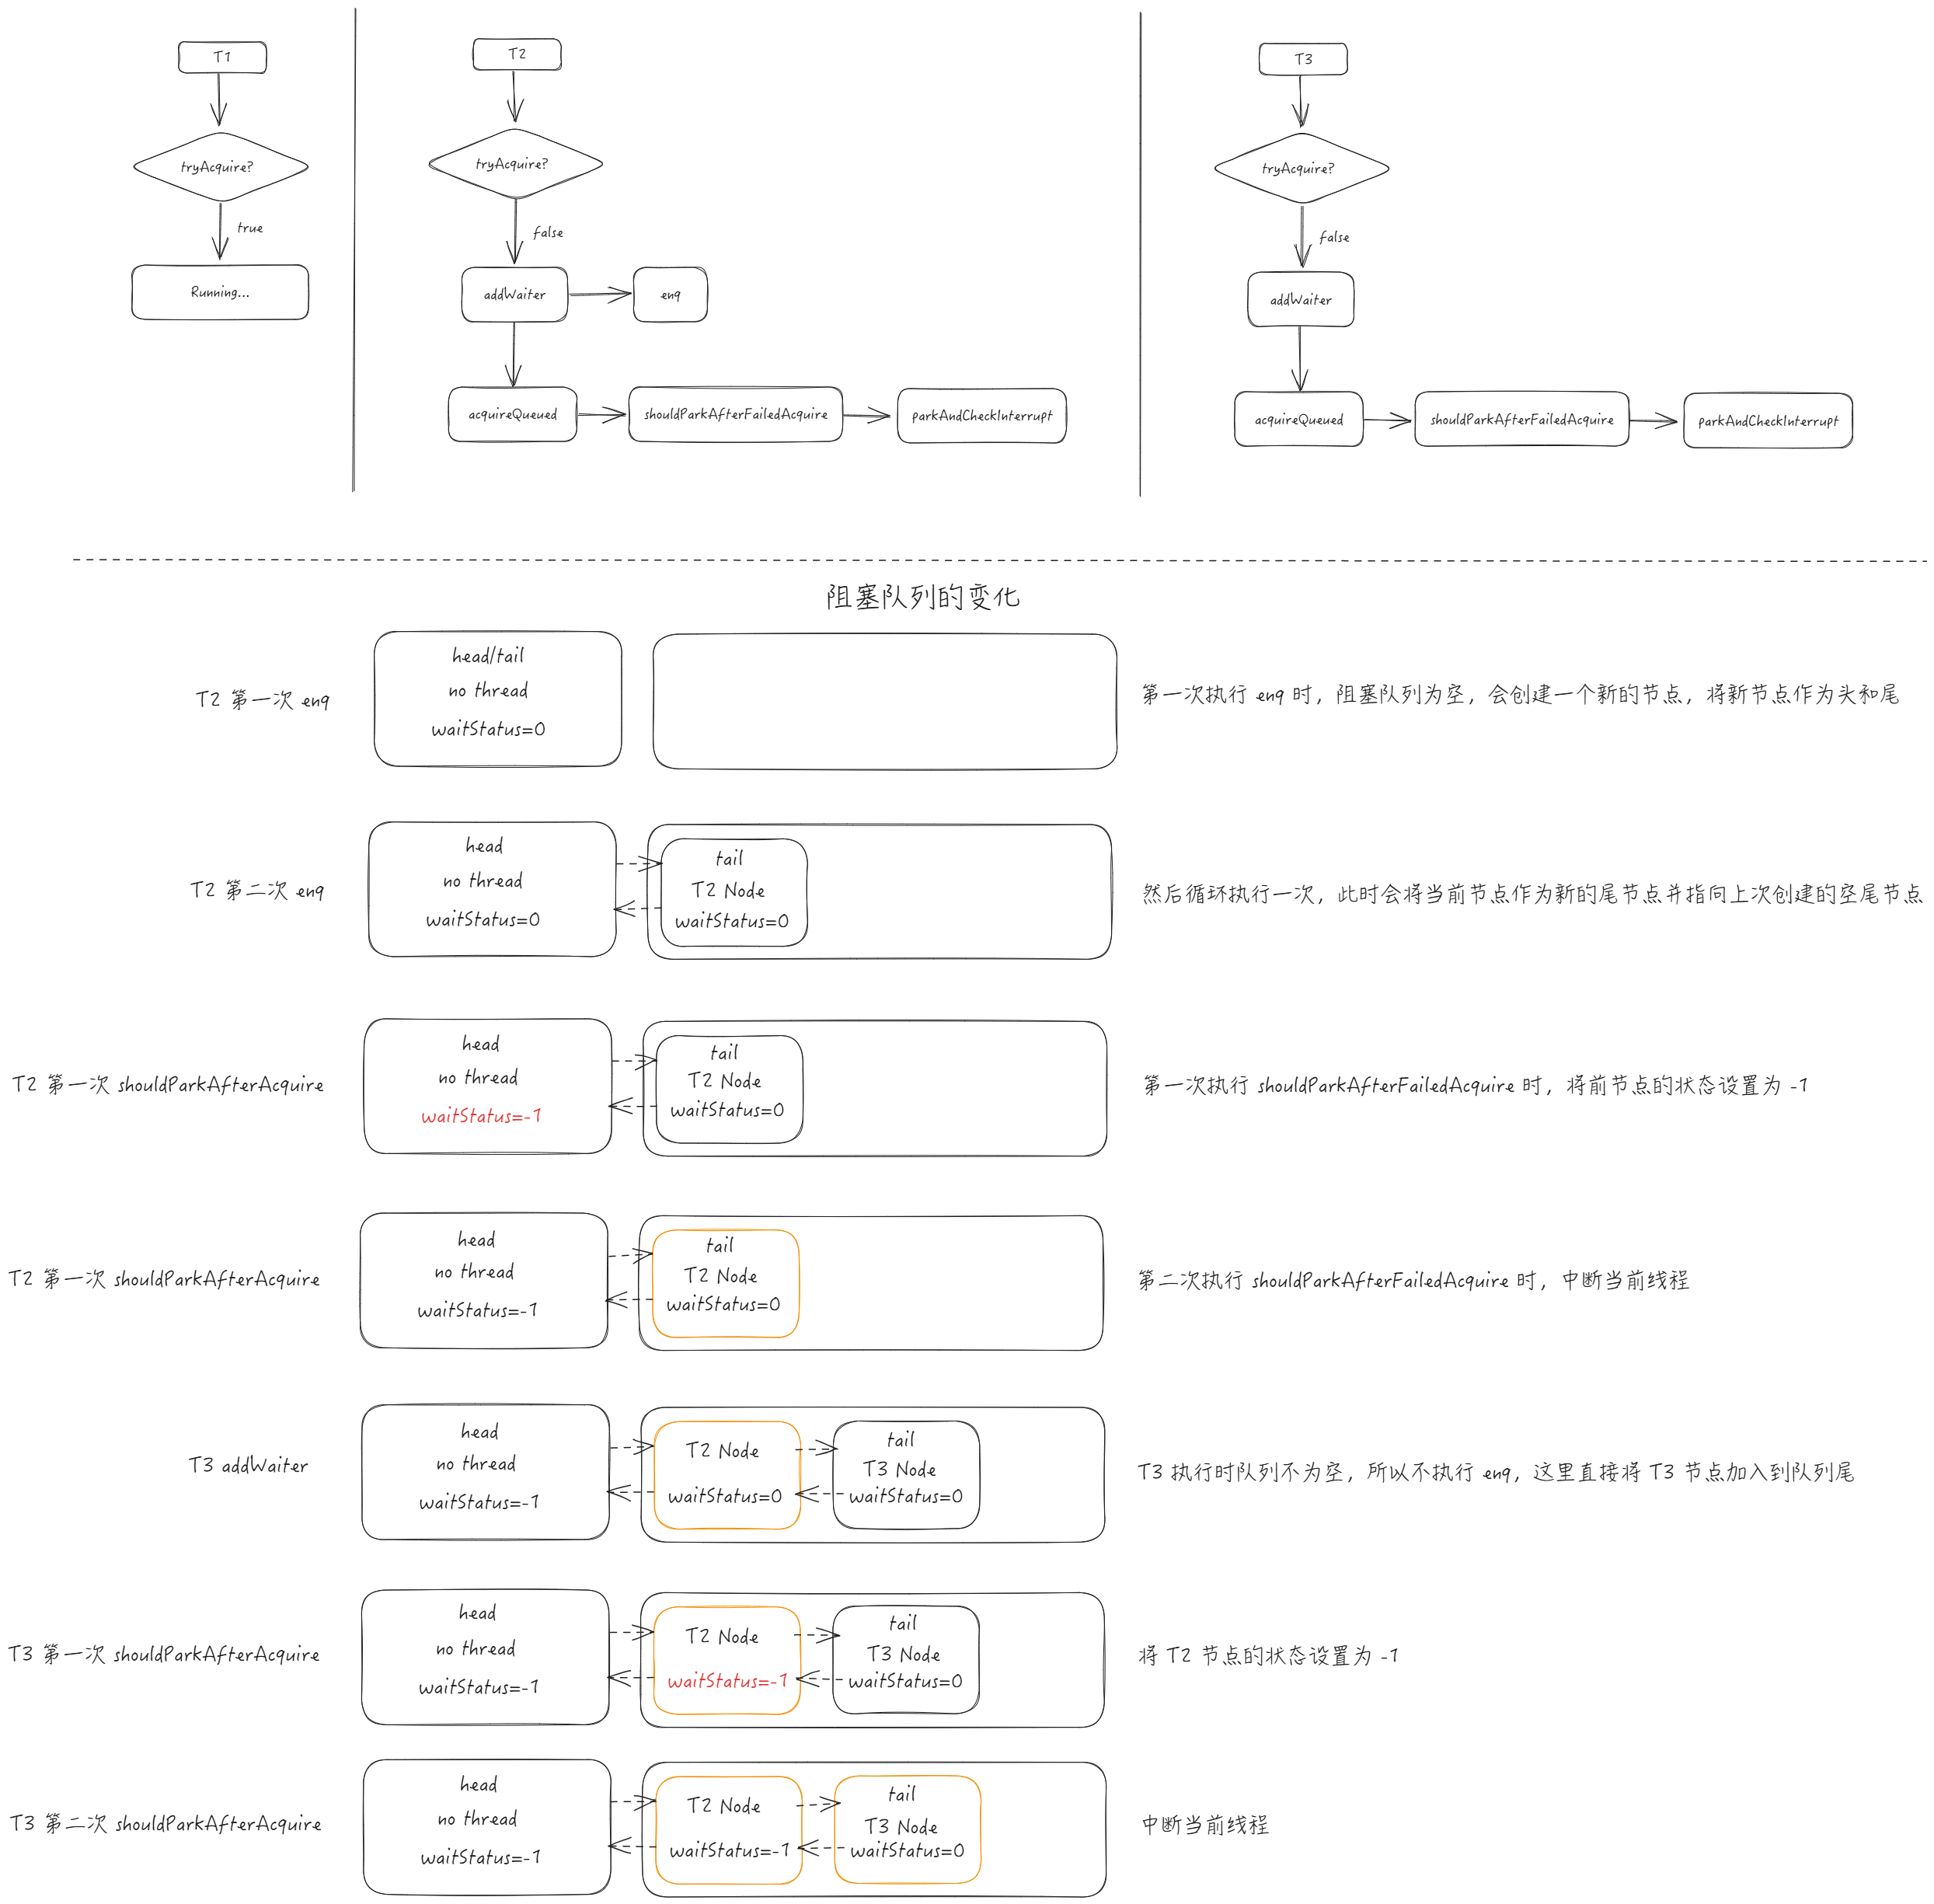
核心方法

acquire 方法:

该方法以独占模式获取资源,忽略中断,即使线程在 acquire 的过程中中断此线程也是无效的

1
2
3
4
5
6
7
8
9
10
11
// 通过 tryAcquire 方法尝试获取锁,如果成功了就直接结束
// 否则通过 acquireQueued 方法将当前线程添加到同步队列中
public final void acquire(int arg) {
// 首先调用 tryAcquire 尝试在独占模式下获取对象状态,返回 true/false 表示获取成功/失败
// tryAcquire 由 AQS 的子类提供实现
if (!tryAcquire(arg) &&
// 如果 tryAcquire 调用失败,则调用 addWaiter 方法将当前线程封装为一个节点并通过 acquireQueued 放入同步队列
acquireQueued(addWaiter(Node.EXCLUSIVE), arg))
// 中断当前线程 = Thread.currentThread().interrupt()
selfInterrupt();
}

addWaiter 方法:

1
2
3
4
5
6
7
8
9
10
11
12
13
14
15
16
17
18
private Node addWaiter(Node mode) {
// 创建一个节点,默认为独占模式
Node node = new Node(Thread.currentThread(), mode);
// Try the fast path of enq; backup to full enq on failure
Node pred = tail;
if (pred != null) {
node.prev = pred;
// 利用 CAS 将尾节点设置为新创建的节点
if (compareAndSetTail(pred, node)) {
// 原来的尾节点指向新节点
pred.next = node;
return node;
}
}
// 如果尾节点为 null,说明队列是空的,或者 cas 失败了
enq(node);
return node;
}

enq 方法:

1
2
3
4
5
6
7
8
9
10
11
12
13
14
15
16
17
18
19
20
21
22
23
24
25
private Node enq(final Node node) {
// 自旋,确保节点能成功加入队列
for (;;) {
Node t = tail;
// 尾节点为 null
if (t == null) { // Must initialize
// 通过 CAS 对头节点进行初始化
// 这里需要注意,这里使用的是 Node 的无参构造方法来创建的
// 无参构造是不会给 Node 的线程赋值的,所以这里是个「空」节点
if (compareAndSetHead(new Node()))
// 将尾节点指向头节点
// 注意:这里并没有 return,后面自旋,将 tail(head)作为 Node 的前节点
tail = head;
} else {
// 尾节点不为 null,说明是之前 CAS 失败了或者刚刚初始化了的
node.prev = t;
// 通过 CAS 尝试设置尾节点
if (compareAndSetTail(t, node)) {
// 将原来的尾节点指向新的尾节点 Node
t.next = node;
return t;
}
}
}
}

acquireQueue 方法:

1
2
3
4
5
6
7
8
9
10
11
12
13
14
15
16
17
18
19
20
21
22
23
24
25
26
27
28
29
30
31
32
// 经过了前面的 addWaiter 方法,此时新的节点已经进入到了阻塞队列里了
// 这里 acquireQueued 如果返回 ture 的话,意味着上面会进入 selfInterrupt()
final boolean acquireQueued(final Node node, int arg) {
boolean failed = true;
try {
boolean interrupted = false;
for (;;) {
// 获取当前节点的 prev 节点
final Node p = node.predecessor();
// p == head 说明当前节点虽然进入到了阻塞队列,但是是阻塞队列的第一个,因为它的前节点是 head
// 特别注意的是,阻塞队列不包含 head 节点,head 节点是持有锁的线程,head 后面的节点才称为阻塞队列
// 如果 p == head,可以试着去获取锁
// 之所以可以去尝试,是因为可能这个 head,是前面 enq 方法初始化的一个「空」节点
// 这时候 head 并不属于任何一个线程,所以可以尝试去获取锁
if (p == head && tryAcquire(arg)) {
setHead(node);
p.next = null; // help GC
failed = false;
return interrupted;
}
// 如果 p 不是头节点或者尝试获取锁失败了,判断是否需要挂起
if (shouldParkAfterFailedAcquire(p, node) &&
// 挂起当前线程
parkAndCheckInterrupt())
interrupted = true;
}
} finally {
if (failed)
// 取消继续获取锁
cancelAcquire(node);
}
}

shouldParkAfterFailedAcquire 方法:

1
2
3
4
5
6
7
8
9
10
11
12
13
14
15
16
17
18
19
20
21
22
23
24
25
26
27
28
29
30
31
32
33
34
private static boolean shouldParkAfterFailedAcquire(Node pred, Node node) {
int ws = pred.waitStatus;
// 前节点状态为 -1,说明前节点状态正常,当前线程需要挂起,可以直接返回 true
if (ws == Node.SIGNAL)
/**
* This node has already set status asking a release
* to signal it, so it can safely park.
*/
return true;
// 前节点状态 > 0,说明前节点取消了排队
// 这里需要知道的是:进入阻塞队列的线程会被挂起,而唤醒操作是需要前节点来完成的
// 所以这里将当前节点指向「前前节点」
if (ws > 0) {
/**
* Predecessor was cancelled. Skip over predecessors and
* indicate retry.
*/
do {
node.prev = pred = pred.prev;
} while (pred.waitStatus > 0);
pred.next = node;
// 前节点状态可能是 0,-2,-3
// 前面的方法中都没有对当前节点的状态进行更新,所以当前节点的状态应该是默认的 0
// 所以这里将前节点的状态设置为 -1(返回 false 后会再度进到这个方法,然后进入第一个 if 分支)
} else {
/**
* waitStatus must be 0 or PROPAGATE. Indicate that we
* need a signal, but don't park yet. Caller will need to
* retry to make sure it cannot acquire before parking.
*/
compareAndSetWaitStatus(pred, ws, Node.SIGNAL);
}
return false;
}

关于 shouldParkAfterFailedAcquire 方法的返回值:

  • True:说明当前节点的前节点状态为 -1,这属于正常情况,当前线程将会被挂起,等待前节点的唤醒
  • False:说明前节点的状态不正常,这里要么是换了前节点要么是更新了前节点的状态,所以需要下次循环再进来方法验证下前节点的状态

这里需要深刻理解前节点状态这个关键属性,还要注意队列的 head 不属于阻塞队列这个特点

release 方法:

release 用于独占模式中释放锁

1
2
3
4
5
6
7
8
9
10
11
12
13
14
15
16
17
18
19
20
21
22
23
24
25
26
27
28
29
30
31
32
33
34
35
36
37
38
39
40
41
42
43
public final boolean release(int arg) {
// tryRelease 是一个模板方法,留给子类去实现
if (tryRelease(arg)) {
Node h = head;
if (h != null && h.waitStatus != 0)
// 唤醒后继节点
unparkSuccessor(h);
return true;
}
return false;
}

private void unparkSuccessor(Node node) {
/*
* If status is negative (i.e., possibly needing signal) try
* to clear in anticipation of signalling. It is OK if this
* fails or if status is changed by waiting thread.
*/
int ws = node.waitStatus;
if (ws < 0)
// 如果节点状态小于 0,说明处于等待或阻塞状态,这时就直接通过 CAS 将节点状态置为初始状态
compareAndSetWaitStatus(node, ws, 0);

/*
* Thread to unpark is held in successor, which is normally
* just the next node. But if cancelled or apparently null,
* traverse backwards from tail to find the actual
* non-cancelled successor.
*/
// 下面就是唤醒后继节点
// 有可能后继节点取消了等待(waitStatus = 1)
// 从队列尾往前找,找到 waitStatus <= 0 的就排到最前面
Node s = node.next;
if (s == null || s.waitStatus > 0) {
s = null;
for (Node t = tail; t != null && t != node; t = t.prev)
if (t.waitStatus <= 0)
s = t;
}
// 到这里说明节点状态是 0,直接唤醒就可以了
if (s != null)
LockSupport.unpark(s.thread);
}

waitStatus

开头简单了解了下 waitStatus 这个 Node 内部类的关键属性,在整个 AQS 的流程中,waitStatus 的作用很关键,这里再总结下它不同值的意义

  • 1(CANCELLED)

    表示当前节点已经取消排队

    线程可能因为超时或者中断等原因放弃等待,这种状态的节点不会再被唤醒而参与锁的争夺。处于此状态的节点不会再继续执行任何操作,通常会从同步队列中被移除

  • -1(SIGNAL)

    表示当前节点的后继节点需要被唤醒

    当一个节点的线程释放锁时,需要通知其后继节点,因此,前一个节点将自己的状态设置为 SIGNAL,用来表示后继节点需要被唤醒

  • -2(CONDITION)

    表示当前节点正在等待条件(Condition)

    当线程调用 Condition.await() 方法时,会将节点的状态设置为 CONDITION,并将节点加入到条件队列。当其他线程调用 Condition.signal() 时,该节点会被移回同步队列

  • -3(PROPAGETE)

    表示当期节点的共享锁释放时,需要唤醒其他节点

    此状态主要用于共享模式(例如在 ReentrantReadWriteLock 中读锁的释放)。它表示锁的释放动作应该向后传播给后继节点

  • 0

    默认值,表示当前节点处于正常状态,未进行任何等待或者取消

    当节点刚刚加入到同步队列时,waitStatus 默认为 0,表示该节点没有被设置为任何特殊状态(如取消、等待唤醒等)

核心流程

AQS 独占锁模式核心流程

这里用三个线程对 AQS 的独占锁模式核心流程做一个说明

线程 T1 首先获取到锁,此时阻塞队列是空的没有任何节点,因为此时并不存在任何竞争

在线程 T1 执行的过程中,线程 T2 参与进来尝试获取锁

线程 T2 在 tryAcquire(arg) 执行失败之后,接着执行 acquireQueued(addWaiter(Node.EXCLUSIVE), arg)

线程 T2 便首先进入到了 addWaiter 方法中,因为此时队列是空的,所以会执行 enq 方法初始化出来一个「空节点」作为头和尾,然后再循环执行一遍 enq 方法,此时会将尾节点改为线程 T2 的节点

到这里 addWaiter 方法算是执行完毕

接着执行 acquireQueued 方法,这个方法的关键在于 shouldParkAfterFailedAcquire

这个方法同样会执行两遍,一遍用于将前节点(空节点)的状态改为 -1,一遍用于中断当前线程

线程 T3 与线程 T2 的区别在于线程 T3 不会去执行 enq 方法,因为此时队列是初始化过了的

整个过程有几点是很关键的:

  • 头节点不属于阻塞队列
  • 节点的状态(waitStatus)是由后继节点来更新的